Creality Ender 3 V2 Review
The Ender 3 V2 is often recommended as a first printer for good reason: great print quality, a Carborundum glass bed, quiet TMC2208 drivers, and a price that won't break the bank. It may lack the bells and whistles of class leaders, but it hangs with them on print quality for a fraction of the cost.

Score breakdown
A budget classic that still earns its place
The Creality Ender 3 V2 is a solid entry-level printer that punches way above its price. It has a sturdy aluminum frame, a glass bed that grips well and releases cleanly, and a 32-bit quiet board that keeps it running silently. You get manual bed leveling and a knob-controlled UI, but once it's dialed in, it delivers clean, consistent prints.
Print quality is sharp right out of the box, and the open design makes it a breeze to modify or upgrade. It doesn't have auto bed leveling or direct drive by default, but you can add those if you want more control. For the price, it is one of the most capable machines out there and a favorite among modders for a reason.

An Overview of the Creality Brand
Creality has built a reputation as one of the most dominant players in the consumer 3D printing space. Founded in Shenzhen in 2014, the company focused early on making inexpensive, reliable machines that could be modded and pushed far beyond stock settings.
Creality's strength is in striking the right balance between cost, performance, and mod potential. Their 3D printers are often simple by design but leave plenty of room for upgrades. From glass beds and dual Z-axis kits to direct drive and all-metal hotends, most Creality models are made to grow with the user. They do not lock you into a closed system, which is a big reason the DIY and maker communities back them.
The brand's lineup has expanded fast in recent years. They have even pushed into automation with newer models' features like input shaping and AI-assisted printing. Not everything they put out is perfect, though. However, in regards to value for money and community support, Creality stays at the front of the pack.
Unboxing and Building the Creality Ender 3 V2
Building the Ender 3 V2 isn't complicated, but it's still a proper hands-on setup. Right out of the box, it's clear this isn't a fully prebuilt machine.
What's in the Box?
When you crack open the box, you'll notice this machine isn't fully assembled, allowing you to understand its inner workings from the start. At the top is the pre-assembled base, which features the heated glass bed and the main electronics board. The frame parts are carefully wrapped and separated, and mechanical components such as the extruder assembly, rods, bearings, and wheels are individually packaged with clear instructions. You also get a basic toolset and spare parts.
- ▪Pre-assembled base with heated glass bed
- ▪Integrated power supply
- ▪Aluminum extrusions, brackets, connectors
- ▪Gantry & X-axis carriage parts
- ▪Mounted stepper motors
- ▪Extruder assembly and hotend unit
- ▪Main control board with color LCD screen
- ▪Labeled wiring harness and cables
- ▪Allen keys and screwdrivers
- ▪Spare screws, nuts, and zip ties
- ▪Step-by-step assembly manual
- ▪Bed leveling and calibration guidelines
Building the Machine
Building the Creality Ender 3 V2 is a satisfying, hands-on project. During unboxing, you're met with a neat layout of pre-assembled components and packed parts, with a clear instruction manual to help you verify what's included before you get to work.
Assembly is straightforward but requires patience. You'll start by assembling the aluminum frame and making sure everything is squared up tight. Getting the gantry aligned, the rollers adequately tensioned, and the belts set is key to avoiding future print issues. The wiring afterward is easy, thanks to clearly labeled connectors.
Once the machine is together, you will level the bed manually and dial in your first settings. This step takes time, but it's worth doing right. Seeing the printer fire up and lay down that first layer makes the whole process worth it. The build helps you learn the machine inside and out, which pays off when it's time to troubleshoot or upgrade.
| Stage | Time Estimate | Key Challenges | Tips / Notes |
|---|---|---|---|
| Unboxing & Inventory Check | 30 to 60 minutes | Verifying all parts are present, especially small fasteners | Cross-check against the official checklist; sort and label all components. |
| Frame Assembly | 1.5 to 2 hours | Keeping the frame square; brackets and rods firmly secured | Use a machinist's square; gradually tighten screws to prevent warping. |
| Print Bed & Y-Axis Assembly | 1 to 1.5 hours | Aligning the glass bed; assuring smooth Y-axis motion | Confirm the bed is firmly in place; check wheel tension and alignment. |
| Extruder & Hotend Installation | 1 to 2 hours | Installing the extruder correctly; preventing hotend leaks | Double-check tube fit and screw fastening; ensure consistent filament flow. |
| Wiring & Electronics | 1 to 2 hours | Organizing cables; securing connections to avoid shorts | Follow the wiring diagram closely; label cables and use clips for neat management. |
| Firmware Setup & Calibration | 1 to 2 hours | Loading firmware; fine-tuning bed and nozzle calibration | Use the built-in leveling system and run a few test prints to adjust settings. |
Our Initial Impressions on Build Quality
The build quality of the Creality Ender 3 V2 impressed due to its solid construction and precise engineering. The aluminum frame feels durable, and the glass bed offers exceptional stability. The components are well-finished and fit with minimal gaps or looseness, showing that Creality invested considerable effort in a design that works efficiently and reliably.
For the price, the Ender 3 V2 strikes a good balance between usability and quality. It feels put together and not overbuilt. This isn't a heavy-duty workhorse, and that's fine. It's designed more for learning, tinkering, and reliable daily prints, not for running non-stop use.

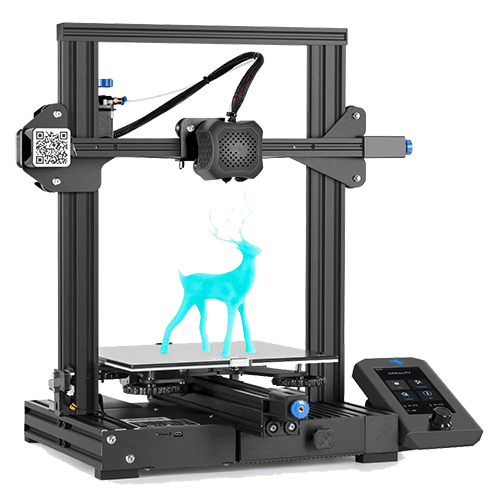
Design, Build Quality, and Technical Specifications
Creality made sure the Ender 3 V2 hits a sweet spot for first-timers and experienced users who don't need a heavy-duty 3D printing machine. The overall build is clean and uncluttered, with an intuitive layout that makes setup a breeze.
Key Technical Specifications
- ▪Build Volume: 220 x 220 x 250mm
- ▪Printer Size: 475 x 470 x 620mm
- ▪Weight: 7.8kg
- ▪Build Surface: Carborundum glass
- ▪Display: 4.3″ color LCD (knob control)
- ▪Mainboard: 32-bit silent (TMC2208)
- ▪Extruder: Bowden
- ▪Bed Leveling: Manual
- ▪Max Print Speed: 180mm/s (typical 60-100)
- ▪Layer Height: 0.1-0.4mm
- ▪Nozzle: 0.4mm, ≤255°C
- ▪Heatbed Temperature: ≤100°C
- ▪Filament Diameter: 1.75mm
- ▪Supported Filaments: PLA, PETG, ABS, TPU
- ▪Connectivity: microSD, USB
- ▪Resume Printing: Yes
Mechanical and Safety Features
This printer's mechanical features guarantee efficient performance without overcomplicating things. The aluminum frame provides a sturdy foundation, while the precision rods and V-slot wheels ensure smooth, consistent movement. The heated glass bed improves print adhesion and contributes to uniform heat distribution.
Safety and reliability features add further appeal. The power supply is securely mounted to help prevent electrical issues, and the wiring is neatly arranged, reducing the risk of misconnection. Built-in mechanisms like thermal runaway protection provide peace of mind during extended usage.
Print Performance and Quality
The Creality Ender 3 V2 delivers reliable performance for everyday prints and more detailed models. This printer balances decent speed with admirable print quality, making it a versatile choice for makers who want reliable results without complex features.
When it comes to speed and precision, the Ender 3 V2 delivers more than you would expect from a budget printer. It can achieve higher print speeds without sacrificing detail, as evident in the smooth transitions between layers during long prints. Acceleration and deceleration are finely tuned, ensuring each move is calculated to maintain dimensional accuracy.
Test Prints and Benchmark Results
| Test Type | Result Highlights | Observations |
|---|---|---|
| Calibration Cube | Accurate dimensions, crisp edges and smooth transitions | Consistent quality overall; slight stringing noted at the corners. |
| Detailed Model | Fine details well reproduced; surfaces clean and smooth | Minimal artifacts in dense areas; may require minor tuning for best quality. |
| Overhang & Bridge | Good structural integrity on overhangs and bridges | Cooling efficiency supports clean bridging; a bit of drooping on extreme spans. |
| Print Tower | Stable layering with strong vertical consistency | Minor vibrations at higher levels; overall dimensional accuracy is solid. |
Firmware, Tuning, and Calibration
The Ender 3 V2 comes with solid stock firmware that gets you printing right out of the box, but it also offers room for tweaks. Many enthusiasts flash updated firmware such as Marlin to unlock additional settings. With either, you'll have plenty of options to customize printing profiles and optimize performance.
Calibration is where you make the Ender 3 V2 your own. Manual bed leveling is the foundation for a perfect first layer. Here are quick adjustments for the best performance:
- ▪Adjust bed leveling screws to maintain uniform nozzle distance across the build plate.
- ▪Calibrate extruder steps per millimeter using a calibration cube.
- ▪Fine-tune retraction settings to reduce stringing.
- ▪Set optimal nozzle and bed temperatures based on filament type.
- ▪Ensure belt tension is even for precise movements.
- ▪Perform test prints to verify and refine each adjustment.

Advanced Features and Upgrades
The Ender 3 V2 is solid out of the box, but it turns into a real workhorse with the right hardware upgrades. It's particularly popular among hobbyists and DIY enthusiasts who appreciate the design and the chance to learn through hands-on assembly.
Here are the most popular upgrades users install to boost print quality, capability, and reliability:
- ▪All-metal hotend for PETG, ABS, and Nylon
- ▪Full-metal dual-gear extruder
- ▪Capricorn PTFE tube
- ▪BLTouch or CR Touch auto-leveling sensor
- ▪PEI-coated spring steel bed
- ▪Silicone bed spacers
- ▪Raspberry Pi running OctoPrint
- ▪Creality Sonic Pad (Klipper)
The open frame makes it a blank slate for mods. Print your own tool holders, cable chains, and fan ducts; there's a huge community of drop-in upgrades on Thingiverse and Printables. Enclosures are another smart move, especially if you print ABS or want to keep dust out, helping with print quality, temp stability, and noise.

Maintenance, Upkeep, and Reliability
The Ender 3 V2 can put in serious hours if you take care of it. It does not need babying but demands regular checks and basic maintenance. Treat it like a machine built for work, and it'll keep cranking out prints. Here's what to stay on top of:
- ▪Clean the bed surface regularly with isopropyl alcohol.
- ▪Check belt tension every couple of weeks.
- ▪Grease the Z-axis lead screw to avoid binding.
- ▪Replace nozzles and PTFE tubing as they wear.
- ▪Tighten frame bolts monthly to maintain rigidity.
One of the biggest strengths of the Ender 3 V2 is how easy it is to maintain and repair. Every part you'll ever need is easy to find, and even bigger components like hotends, boards, and extruders have many drop-in replacements. If something fails, you're not stuck waiting weeks or forced into expensive proprietary parts.
Common Issues with the Creality Ender 3 V2
It's a reliable printer, but like anything mechanical, it has its weak points. Here's a breakdown of the everyday problems and their fixes:
- ▪Plastic extruder wears out — replace with an all-metal extruder for better durability and grip.
- ▪Bed leveling drifts — install silicone spacers to hold the bed steady through multiple prints.
- ▪Fan noise or failure — swap stock fans with quiet or high-performance replacements.
- ▪Nozzle clogs — clean regularly and replace every few months, especially with heavy use.
- ▪Loose belts or eccentric nuts — check and tighten as needed to maintain print accuracy.
- ▪Worn PTFE tubing — replace if it deforms or extrusion starts slipping at higher temps.

Comparisons with Alternative Models
When you're deciding on a DIY 3D printer, there are several solid options besides the Ender 3 V2. Each has its own strengths. Here's how the leading alternatives stack up in the areas that matter most.
| Creality Ender 3 S1 | Anycubic i3 Mega | Artillery Sidewinder X1 | Elegoo Neptune 2 | |
|---|---|---|---|---|
| Build Volume | 220 x 220 x 250 mm | 210 x 210 x 205 mm | 300 x 300 x 400 mm | 220 x 220 x 250 mm |
| Print Speed | Up to 180 mm/s | 60-80 mm/s | 100-150 mm/s | Up to 100 mm/s |
| Assembly | Moderate; partly pre-assembled | Mostly pre-assembled; very easy | Low to moderate; largely pre-assembled | Easy; partly pre-assembled |
| Price Range | $250 – $350 | $250 – $350 | $400 – $500 | $200 – $300 |
| Customization | Highly modifiable with abundant upgrades | Less customization than Creality models | Moderate; upgrade options available | Fair; some potential for upgrades |
The Creality Ender 3 S1 has a more rigid structure and a removable magnetic bed, but lacks the V2's quiet operation and higher-quality display. The Anycubic i3 Mega adds a touchscreen and pre-assembled frame, but the Ender 3 V2 generally offers a better upgrade path and a larger community for mods.
The Artillery Sidewinder X1 offers a larger print volume and a direct-drive extruder for flexible filaments, though its bulkier size may be a concern. The Elegoo Neptune 2 is an affordable alternative with auto-leveling in the base model, but its upgrade potential and community support aren't as strong as the Ender 3 V2's.

Our Final Take
We really like the Creality Ender 3 V2. It offers solid print quality, a rigid build, and large upgrade potential. With features like a glass bed for better adhesion, quieter operation, and a more refined user interface, it's a great choice for both beginners and more experienced users.
Basic maintenance like bed leveling and nozzle cleaning is manageable, and the strong community support makes troubleshooting and upgrades easy. We highly recommend the Ender 3 V2 as the first 3D printer for anyone looking to dive into the hobby while still having room to grow.

Scott Gabdullin is a Canadian entrepreneur, investor, and marketing expert who has successfully combined his passion for technology and innovation with a love for adventure and exploration.
Scott brings 12 years of digital marketing experience and a hardcore work ethic to his new passion for 3D printing. If he is not working on this business, he is likely travelling and Overlanding across North America with his wife and 2-year-old son in their Jeep Rubicon.
Read more →