Artillery Sidewinder X1 3D Printer Review
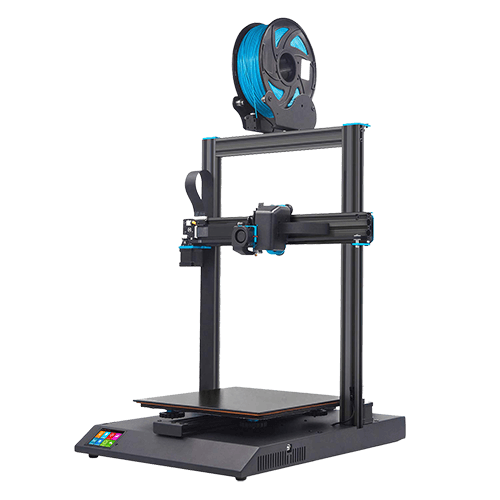
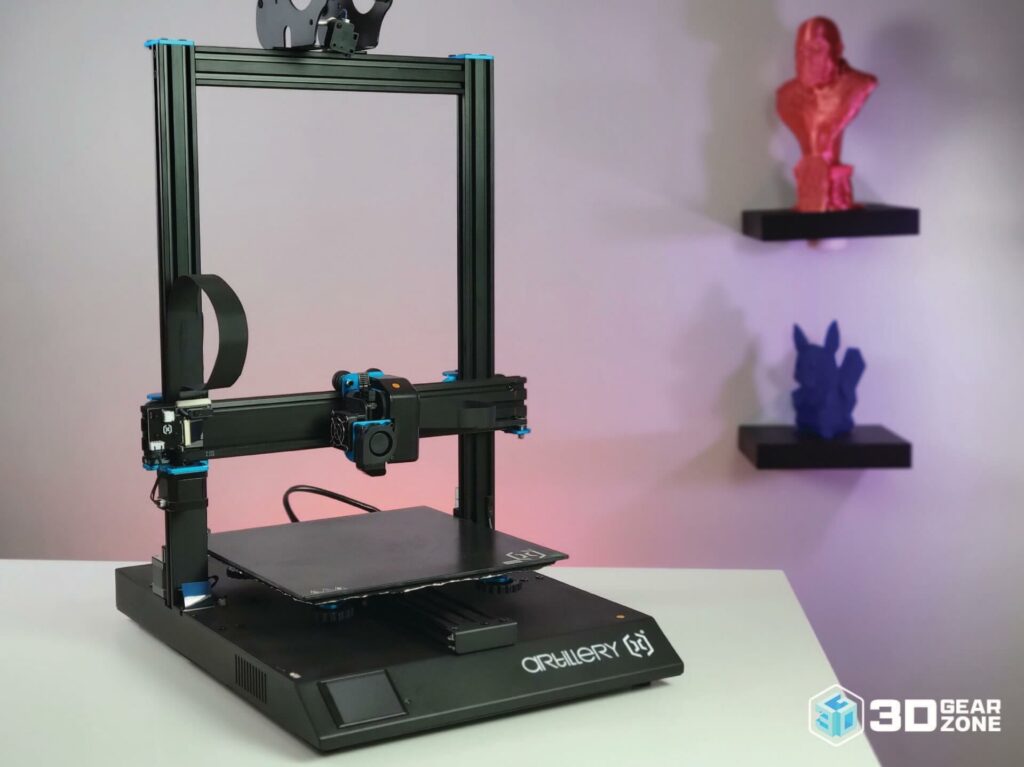
The Artillery Sidewinder X1 is a large-format FDM printer known for its quiet operation, direct drive setup, and roomy 300 x 300 x 400 mm build volume. It's been a favorite for makers who want big prints without big noise.

Score breakdown
Big prints without the big noise
Even in 2025, it still holds up. It may lack some modern features, but it offers great value, especially if you're willing to tinker or upgrade a few things.
When the Sidewinder X1 first hit the market, it filled a clear gap. Large-format printers were usually loud, expensive, or both. The X1 offered a quieter, more affordable option that still delivered reliable results. It quickly gained a following among hobbyists focused on functional parts, cosplay builds, and long prints where size mattered.
Today, it remains relevant for the same reasons. Newer printers bring auto-leveling, network features, and higher-end firmware, but the Sidewinder X1 still appeals if you value proven hardware, consistent output, and a platform that responds well to upgrades.
An Overview of the Artillery Sidewinder X1
The Artillery Sidewinder X1 was first released in late 2018 by Shenzhen Yuntuchuangzhi Technology Co., Ltd., under the Artillery brand. At the time, the desktop FDM 3D printing market was crowded with small-to-mid-size printers, often lacking premium features or shipping with loud, outdated components. Artillery aimed to change that.
The Sidewinder X1 was designed to be a mid-to-large format printer that didn't scream budget. It featured silent stepper drivers, a direct drive extruder, a full-size AC heated bed, and a sleek aluminum frame, which was all rare at its price point. The goal was to provide a nearly plug-and-play experience without compromising on features or print size.
Artillery wanted to reach prosumers and serious hobbyists looking for a larger build volume without breaking the bank, and it worked. The initial reception was mostly positive, with early adopters praising the machine's quiet operation, smooth movement, and generous print area. Of course, it wasn't perfect; ribbon cable durability and firmware quirks were early concerns, but many users were willing to accept or fix those in exchange for the value offered.
We see the Sidewinder X1 as one of the first printers that truly brought premium features into the sub-$500 market. And while it may not be the latest model on shelves today, it set a tone that many newer machines still follow.
Unboxing and Building the Machine
Unboxing the Sidewinder X1 is refreshingly simple for a printer of its size. The packaging is solid, with foam inserts protecting the gantry, base, and accessories. Most of the machine comes preassembled, so you won't need to deal with complicated component setups or intricate cable routing.
Once out of the box, you only need to attach the gantry to the base using four bolts, plug in a few clearly labeled connectors (mostly ribbon cables), and square up the frame. Artillery even includes a basic toolkit with Allen keys, a spare nozzle, and a scraper. If you're familiar with basic DIY assembly, you'll likely be ready to print in under 30–40 minutes.
What's in the box
- ▪Sidewinder X1 main base and gantry
- ▪Pre-attached direct drive hotend with ribbon cable setup
- ▪Power cable
- ▪Basic toolkit (Allen keys, wrench, nozzle, and scraper)
- ▪Spare ribbon cables
- ▪MicroSD card and USB adapter
- ▪Sample filament coil
- ▪Quick start guide and instruction manual
Building the Machine
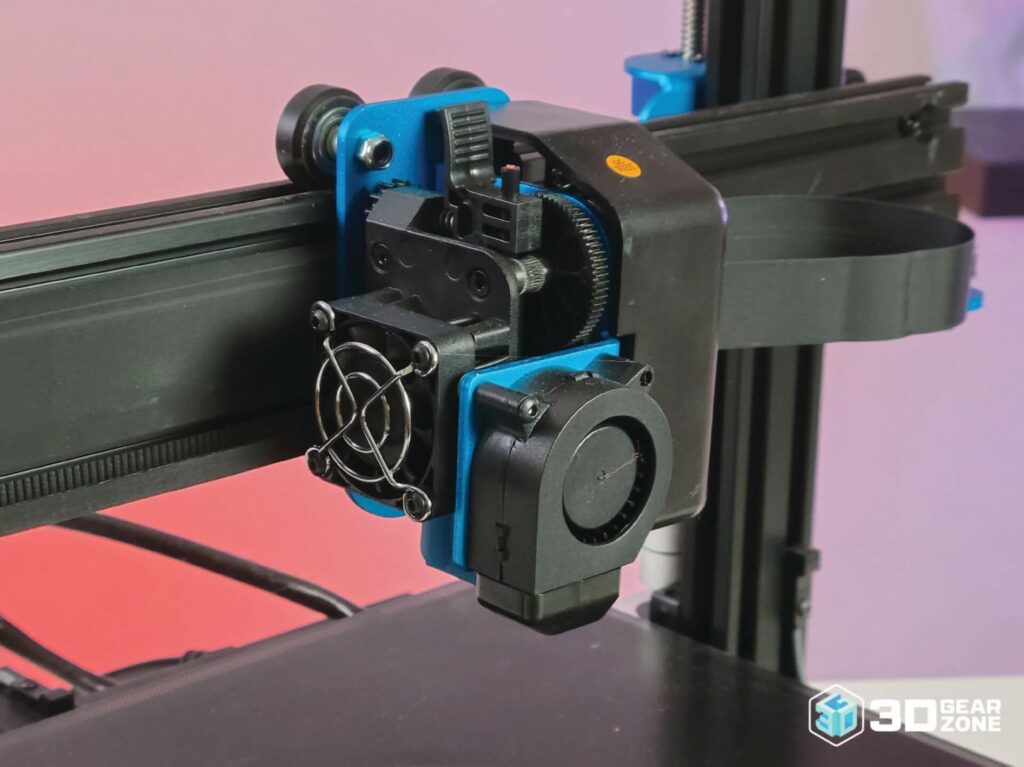
Compared to many budget FDM printers, the Sidewinder X1 leans heavily toward convenience. The Z-axis dual gantry is already fully assembled and aligned. The extruder is mounted and pre-wired using flexible ribbon cables, cutting down on build time. All you do is bolt the frame to the base, connect three ribbon cables (Z, X, and extruder), and you're ready for the leveling process.
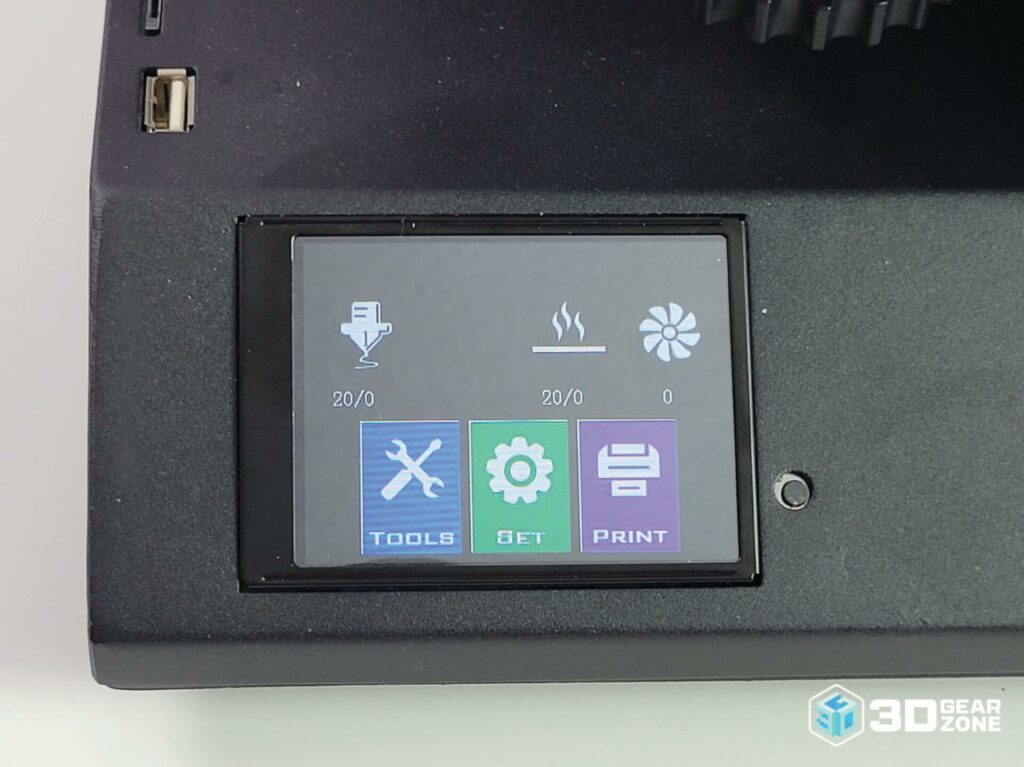
There's no firmware flashing required, and the touchscreen interface powers up right away with a simple and intuitive layout. The large build plate comes pre-installed with a glass surface, and the AC heated bed gets to temp quickly.
Artillery's design clearly prioritized speed and simplicity. While it doesn't include automatic bed leveling, the knobs are large and easy to access, and the touchscreen includes manual bed-leveling prompts.
| Setup Step | Estimated Time | What to Watch For | Helpful Tip |
|---|---|---|---|
| Unboxing & Placement | 10–15 minutes | Lifting with care | Have a second person help if needed |
| Gantry Assembly | 10–15 minutes | Aligning bolts correctly | Don't overtighten the screws |
| Cable Connections | 5 minutes | Ribbon cable orientation | Match labels before plugging in |
| Manual Leveling | 10–15 minutes | Adjusting corners evenly | Use a piece of paper for spacing |
| First Print Setup | 5–10 minutes | Loading filament & test file | Use the included PLA sample for your first print |
Initial Impressions
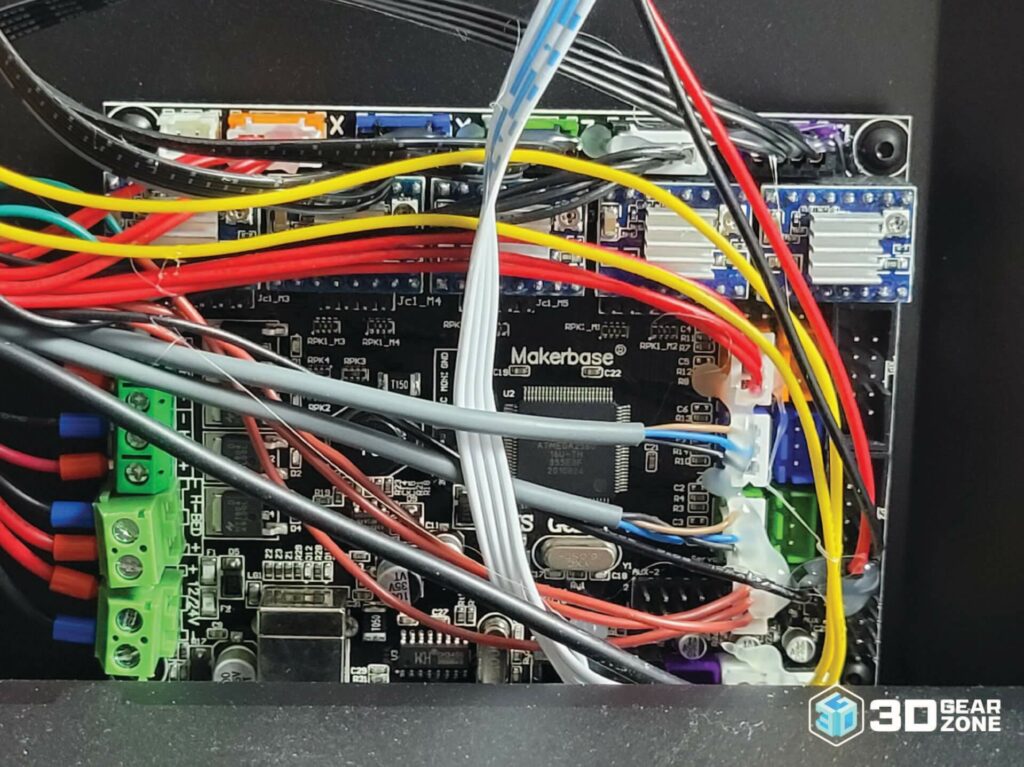
The Sidewinder X1 feels like a printer built to impress from the first moment. The aluminum frame is sturdy, the wiring is clean, and the large touchscreen interface is responsive. Its quiet movement, thanks to TMC silent drivers, is noticeable even during early test prints.
The manual bed leveling process is basic, but easy to learn. You get a real feel for adjusting nozzle distance, dialing in adhesion, and watching that crucial first layer form correctly. For beginners, this hands-on experience is a good intro to what FDM printing requires.
Design and Technical Specifications
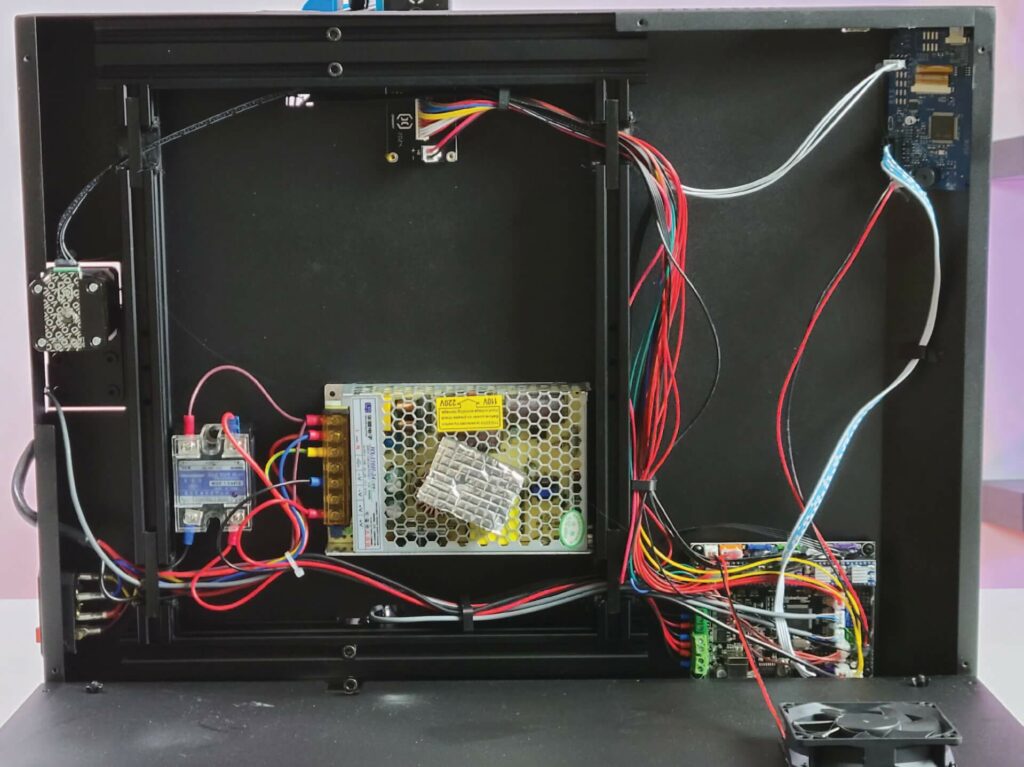
The Sidewinder X1 was built for those who wanted larger prints, quieter operation, and a more polished experience than most budget FDM printers could offer in 2018. Its sleek design includes a full aluminum frame with integrated cable routing, a large silent motherboard, and a touchscreen interface that's clear and simple to use.
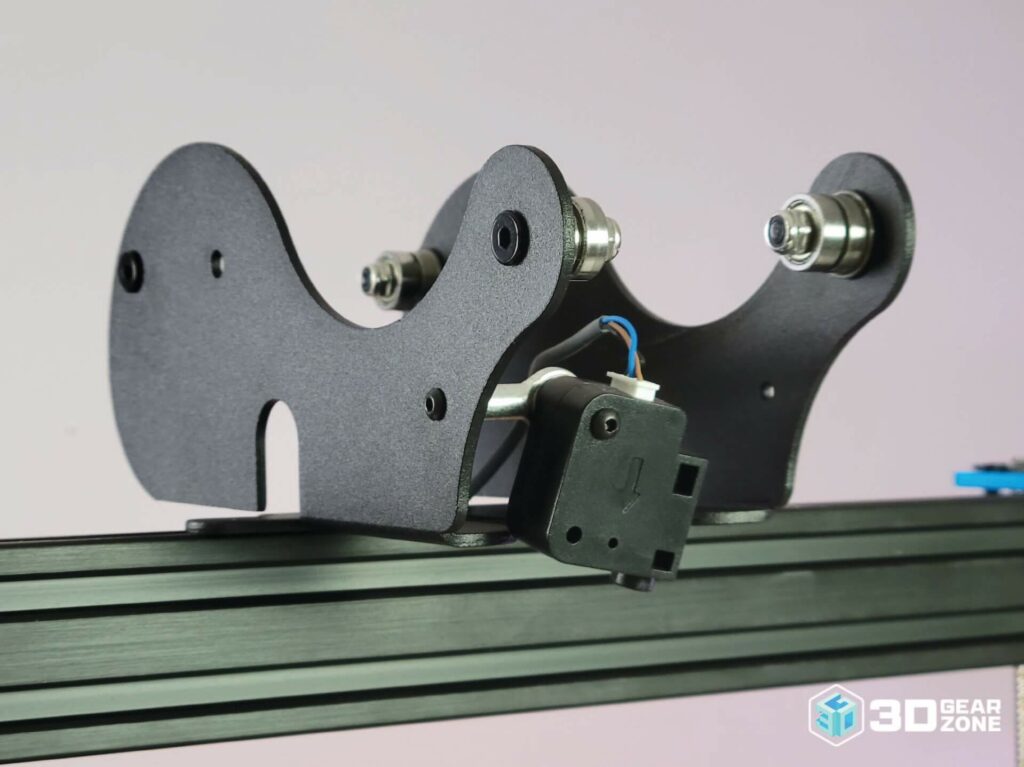
The most prominent feature is its generous 300 x 300 x 400 mm build volume, which makes it suitable for cosplay props, helmets, tall vases, or multi-part functional projects. It uses a Titan-style direct drive extruder mounted on a sturdy carriage, which makes it especially useful for flexible filaments like TPU.
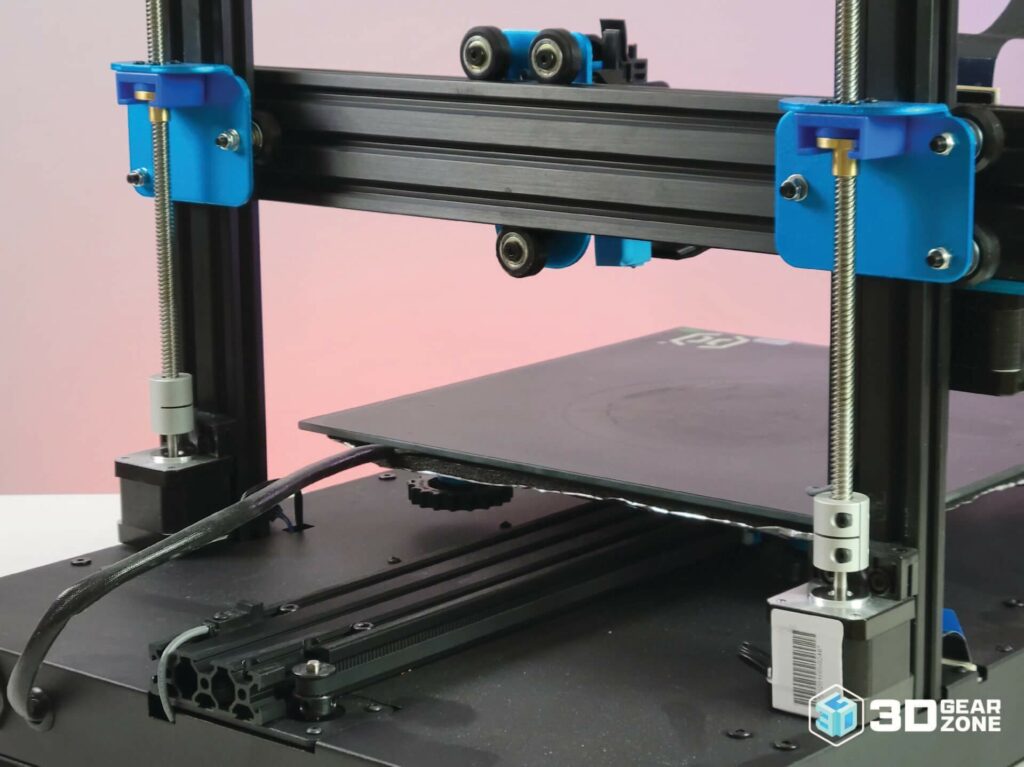
It also includes dual Z-axis lead screws synced by a belt, which helps reduce wobble on tall prints. Silent stepper drivers and a glass build plate round out the feature set, giving users a relatively quiet, stable, and beginner-friendly printing platform.
Specs at a glance
- ▪Build Volume: 300 x 300 x 400 mm
- ▪Print Head: Direct Drive Titan-style extruder
- ▪Hotend: Volcano-style with fast flow capability
- ▪Print Bed: AC heated glass bed, fast heating
- ▪Frame: Full aluminum body
- ▪Z-Axis: Dual lead screws with sync belt
- ▪Motherboard: 32-bit board with silent TMC2208 stepper drivers
- ▪Touchscreen: 3.5-inch color touchscreen
- ▪Connectivity: MicroSD card and USB
- ▪Filament Compatibility: PLA, TPU, PETG, ABS (with enclosure)
- ▪Max Nozzle Temp: ~240°C (stock)
- ▪Max Bed Temp: ~80°C (stock)
Print Quality and Performance
The Sidewinder X1 delivers quality prints that punch well above its price. It produces clean lines, sharp corners, and impressive detail even on taller prints. With proper slicer tuning, stringing is minimal, and the finish is smooth enough for both functional and display pieces.
Its direct drive Titan-style extruder gives it an edge in handling flexible filaments like TPU and soft PLA. You won't need to make major hardware changes to get consistent results, making it a good choice for anyone experimenting beyond standard PLA. Retraction settings still matter, but the default setup handles a wide variety of materials reasonably well.
The generous 300 x 300 x 400 mm build volume is a creative enabler. From cosplay helmets to multi-part prototypes or tall decor prints, the X1 gives you the space to scale your ideas. It's also ideal for batch printing smaller items. That said, the stock glass bed doesn't always offer reliable adhesion, especially with certain filaments or in cold environments. A bit of glue stick, a PEI sheet, or a magnetic plate upgrade can go a long way.
Possible Upgrades for the Artillery Sidewinder X1
If you want to push your Sidewinder X1 to the next level, there is good news. You have options. The X1 is one of those printers that responds well to thoughtful upgrades.
Auto Bed Leveling Sensor (BLTouch or CR Touch)
Manually leveling a large print bed can become tiresome over time. Adding a BLTouch or CR Touch upgrade brings automatic mesh bed leveling to your X1. This sensor maps the surface of your bed and adjusts the Z-axis in real time. You get a consistent first layer even if your bed isn't perfectly flat. It saves time, reduces failed prints, and improves adhesion consistency.
PEI or Magnetic Flex Plate
The stock glass bed can be unreliable when it comes to adhesion. A PEI sheet or magnetic flex plate makes print removal much easier. You no longer need to pry at stubborn prints or risk damaging your model or your fingers. Once the bed cools, most prints pop off with little effort. These surfaces are also compatible with a wide range of materials.
Upgraded Firmware (Marlin or Klipper)
The factory firmware works, but it is a bit outdated. Flashing the latest version of Marlin or switching to Klipper can unlock more advanced features such as linear advance, input shaping, and faster print speeds with smoother motion. Just make sure to back up your settings and double-check all wiring if you decide to upgrade the firmware.
Silicone Bed Mounts
Replacing the stock bed springs with silicone spacers helps stabilize the bed. These mounts maintain their position better over time. You will not need to re-level your bed every few prints. This is a low-cost upgrade that improves reliability and reduces frustration.
Cable Management Mods
The X1's ribbon cables are tidy but tend to wear out with repeated flexing. Many users upgrade to drag chains or use silicone cable extensions to protect these cables. This small adjustment can help avoid electrical issues later on.
All-Metal Hotend
If you plan to print higher-temperature materials such as PETG, ABS, or Nylon, consider upgrading to an all-metal hotend. The stock hotend uses a PTFE liner, which limits your maximum print temperature. Switching to something like a Micro-Swiss all-metal hotend provides better heat stability and more flexibility in filament choices.
Part Cooling Fan Upgrade
Better cooling improves overhangs, bridges, and overall surface quality. Replacing the stock blower fan with a higher-flow unit or installing a dual-fan setup enhances print results, especially with detailed PLA prints. There are also printable fan ducts available that help direct airflow more efficiently.
Z-Axis Stabilizers or Lead Screw Dampers
Tall prints often reveal minor wobbles. Installing Z-axis braces or lead screw dampers can reduce vibration and lead to smoother print surfaces, especially near the top of the build volume. While not required for everyone, this upgrade is useful if you print many tall or slender objects.
Touchscreen Interface Mods or OctoPrint
The stock screen works, but some users install custom user interfaces for greater control. Another option is connecting your X1 to OctoPrint using a Raspberry Pi. This lets you monitor and control your printer remotely, add webcam support, and manage long prints with ease.
Maintenance, Upkeep, and Reliability
Keeping your Sidewinder X1 in good shape isn't complicated, but there are a few habits and checks that will help keep it running smoothly over time. Because of its unique features and design choices, the X1 does have some specific points of attention.
Watch the Ribbon Cables
The flat ribbon cables connecting the extruder and the Z-axis are one of the most fragile parts of the Sidewinder X1. Over time, they can fray or crack due to repeated movement during prints. Check the cables regularly for signs of wear, especially near the extruder end. If you notice creases or damage, replace them immediately. Many users switch to silicone cable mods or drag chains to avoid long-term issues.
Keep the Z-Sync Belt Tight
The Sidewinder X1 uses a belt to synchronize the dual Z-axis lead screws. This belt can loosen over time, leading to uneven Z movements and print artifacts. Make it a habit to check the tension of the Z-sync belt once a month. It should be snug but not overtightened. If it starts to sag, tighten it using the adjustment screw near the stepper motor.
Re-Lubricate the Rails and Lead Screws
Smooth motion means fewer skipped steps and more accurate prints. Every few weeks, clean and lightly lubricate the linear rails and both Z lead screws. Use a PTFE-based lubricant or light machine oil. Just a small amount will go a long way. Wipe away old buildup first so you're not mixing dirt into the new grease.
Check the Bed Level Often
Because the X1 doesn't ship with automatic leveling, your manual bed leveling knobs will gradually drift from vibration or thermal cycling. Every 4–5 prints, especially if you're changing filament types or print temperatures, do a quick level check using the paper method. It takes a couple of minutes and saves you from print failures.
Tighten Frame Screws and Bolts
The X1's aluminum frame is sturdy, but the bolts can loosen with use. Every month or so, go over the major frame screws, gantry mounts, and motor brackets with an Allen key. Don't overtighten, but confirm nothing is wiggling. A wobbly gantry can throw off even the best-tuned slicer profile.
Keep the Glass Bed Clean
The stock bed is tempered glass, and residue from adhesives or finger oils can interfere with adhesion. Clean the bed regularly with isopropyl alcohol and a lint-free cloth. Avoid scratching the surface, and never scrape aggressively. Use a plastic scraper or wait for the bed to cool before removal.
Check for Firmware Quirks
Some early units of the Sidewinder X1 shipped with firmware bugs like thermal overshoots, false triggers, or bad acceleration values. If you're noticing odd behavior, check forums to see if your firmware is out of date. Updating to a fresh Marlin build can often resolve small quirks and improve reliability.
Common Issues and Fixes
Even though the Sidewinder X1 is a solid machine, no 3D printer is perfect. Here are some of the most common issues that owners run into with the X1, along with proven fixes to get you back to smooth printing.
Ribbon Cable Wear and Failures
The most notorious issue on the X1 is the extruder ribbon cable. Over time, it becomes brittle or starts to crack from constant bending. Symptoms include the hotend not heating, the touchscreen going blank mid-print, or the extruder motor stuttering. The long-term fix is to replace the cable or upgrade to silicone wiring with a drag chain mod. Always check for kinks near the printhead and Z-axis connector.
Loose Z-Sync Belt Leading to Uneven Z Movement
The X1 uses a single belt to keep its dual Z-leads in sync. If the belt loosens, one side may lift faster than the other, especially on taller prints. This leads to layer shifts or tilted prints. Use the adjustment screw hidden near the left Z stepper motor to re-tension the belt. You'll notice smoother gantry movement right away.
Extruder Stepper Getting Hot or Skipping Steps
The stock Titan-style extruder works well, but its stepper motor can run hot, especially in warm rooms. Overheating causes skipping and under-extrusion. Adding a small heatsink to the stepper or printing a fan mount for it helps reduce these symptoms. Also, double-check your stepper current in the firmware or replace the motor if it's degrading.
Glass Bed Adhesion Inconsistent on Stock Surface
The textured ceramic coating on the original glass bed looks premium, but it often loses grip after repeated use. PLA tends to warp unless the bed is freshly cleaned. Some users flip the bed to the plain glass side or replace it with a PEI spring steel sheet. Others use a glue stick on the textured side for better results.
Auto Home Overshoots or Crashes into the Frame
On some units, the X-axis endstop can shift slightly, or the gantry may be unbalanced. This causes the nozzle carriage to crash into the side before it detects home. To fix it, verify the endstop position and level the gantry manually with the thumbscrews. If it continues, you may need to shim the Z motor mounts.
Touchscreen UI Freezing on Older Firmware
The Sidewinder X1 originally shipped with a very basic touchscreen interface. Freezing or unresponsive touch controls usually trace back to a corrupted SD card or outdated firmware. Reformatting the card and flashing the latest Marlin+TFT firmware pair generally solves this.
Comparisons with Sidewinder X1 Competitors
If you're considering a large-format FDM printer and the Sidewinder X1 is on your list, it's worth seeing how it stacks up against others in its class. Despite being released back in 2018, the X1 still holds its ground with a big build volume, silent operation, and direct drive performance that appeals to both hobbyists and prosumers.
| Specification | Sidewinder X1 | Creality Ender 3 S1 Plus | Sovol SV03 | Anycubic Kobra Max |
|---|---|---|---|---|
| Build Volume (mm) | 300 x 300 x 400 | 300 x 300 x 300 | 350 x 350 x 400 | 400 x 400 x 450 |
| Extruder Type | Direct Drive | Direct Drive | Direct Drive | Bowden |
| Bed Leveling | Manual (Upgradable) | CR Touch Auto-Leveling | Manual | LeviQ Auto-Leveling |
| Frame Material | Aluminum V-Slot | Full Metal Frame | V-Slot | V-Slot Aluminum |
| Print Surface | Glass Bed (AC Heated) | PC Spring Steel Sheet | Glass | PEI Coated Sheet |
| Touchscreen | 3.5″ Color Touchscreen | 4.3″ Color Touchscreen | Basic LCD | 4.3″ Color Touchscreen |
| Z-Axis Structure | Dual Lead Screws + Sync Belt | Dual Lead Screws | Dual Lead Screws | Dual Z with Belts |
| Price Range (USD) | $320 – $400 | $429 – $499 | $360 – $420 | $499 – $599 |
The Sidewinder X1 doesn't win on every spec, but it still hits a lot of sweet spots. It's quieter than most thanks to its silent stepper drivers, and the direct drive extruder gives it an edge with flexible filaments like TPU. Its AC heated bed also heats up faster and more evenly than DC beds found on some of its competitors.
Compared to the Creality Ender 3 S1 Plus, you give up automatic leveling out of the box, but the X1 usually comes in at a lower price and is easier to maintain. Against the Kobra Max, you sacrifice raw build volume but gain quieter operation and better cable management. Sovol SV03 gives it stiff competition in size, but many users find the X1's print quality more consistent out of the box.
Our Final Verdict
Even with newer models on the market, the Sidewinder X1 continues to stand out for those who want a large-format FDM printer without the bulk price or the bulk noise. It's not the most feature-packed machine in its class, but it delivers consistent print results, a satisfying build area, and one of the quietest operations for its size. The value-for-money ratio is still hard to beat, and many users still rely on it years later because it holds up well and responds positively to upgrades.
If you like to experiment, customize, or just want a dependable workhorse that doesn't make a fuss, the Sidewinder X1 is still worthy.

Scott Gabdullin is a Canadian entrepreneur, investor, and marketing expert who has successfully combined his passion for technology and innovation with a love for adventure and exploration.
Scott brings 12 years of digital marketing experience and a hardcore work ethic to his new passion for 3D printing. If he is not working on this business, he is likely travelling and Overlanding across North America with his wife and 2-year-old son in their Jeep Rubicon.
Read more →