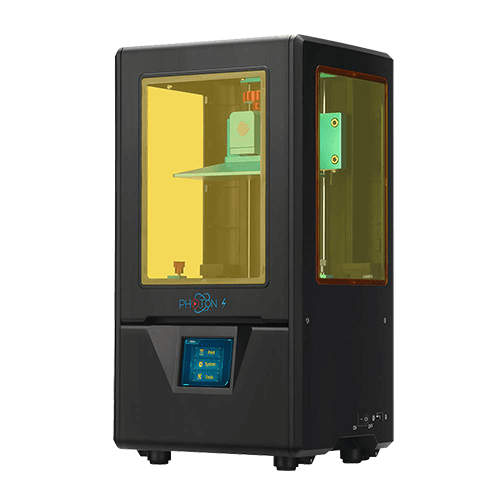
Anycubic Photon S 3D Printer Review
The Anycubic Photon S might not be the newest kid on the block, but it still earns its place on the workbench of many resin printing enthusiasts in 2025. Known for its balance of precision, affordability, and reliability, this compact desktop SLA printer continues to deliver solid results for hobbyists, miniature painters, jewelry designers, and anyone who values ultra-fine detail.

Score breakdown
A refined take on a groundbreaking printer
The Anycubic Photon S uses masked stereolithography (MSLA), where ultraviolet light shines through an LCD screen to selectively cure liquid resin layer by layer. This method allows for exceptional detail, especially in models that require sharp features or fine textures. It doesn't handle huge prints or heavy-duty mechanical parts like an FDM printer might, but for visual fidelity and precision, it's hard to beat.
The Photon S finds its niche among creators who care about detail and consistency. Whether you're making tabletop minis, dental prototypes, or artistic sculpts, it delivers results that look far more expensive than the machine itself. You won't get automation or smart features, but what you do get is a straightforward, dependable printing experience that's still worth it.
An overview of Anycubic Photon S
Anycubic released the Photon S in early 2019 as a follow-up to their original Photon, which is one of the most popular consumer resin printers at the time. The original Photon brought affordable MSLA technology to hobbyists, making high-resolution prints accessible outside of industrial labs. But as users became more experienced, feedback started pouring in: they wanted better stability, easier maintenance, and improvements to the UV light system.
Rather than overhauling the entire machine, Anycubic refined what already worked. The Photon S kept the core design of the original Photon but addressed key concerns:
- ▪Dual Z-axis linear rails for improved print stability
- ▪Upgraded UV LED matrix for more consistent light distribution
- ▪A sturdier, enclosed plastic body
- ▪Slightly improved airflow and internal layout
This wasn't a flashy generational leap, but it was a well-calibrated response to what users actually needed. The result was a printer that built on the Photon's legacy while making it more durable and reliable for regular use.
When it launched, the Photon S entered a growing market. Elegoo, Creality, and Phrozen were starting to make noise in the budget resin scene. But the Photon S carved out a loyal base thanks to its out-of-the-box reliability, clear improvements over the original, and ease of setup.
Over time, the Photon S became a staple for beginners and enthusiasts alike. Even though newer 4K and 6K resin printers have taken the spotlight, the Photon S remains in rotation in many workshops due to its consistency and minimal fuss. It's not flashy. It just works.
Unboxing and Setup Experience
Unboxing the Anycubic Photon S is a very different experience from a DIY FDM kit. Instead of bags of bolts and frame parts, you get a sleek, pre-assembled machine ready to use with minimal setup. The printer arrives in molded foam packaging with each component snugly secured with no rattling parts, no digging for screws.
You'll find the printer fully assembled except for the build plate and resin vat, which are simple to install. The manual walks you through the process clearly, and most users report getting from unboxing to first print in under 30 minutes. It's a low-friction entry into resin printing, perfect for users who want to get started quickly.
There's no frame to build or wiring to run. Instead, the only hands-on setup involves mounting the build platform, leveling it using the paper method, and inserting the USB drive with a sliced file. Unlike printers that require firmware flashing or tinkering, the Photon S is operational right out of the box.
What's in the Box
- ▪Photon S printer (mostly pre-assembled)
- ▪Resin vat with pre-installed FEP film
- ▪Build platform
- ▪USB stick with test prints
- ▪Scrapers (metal and plastic)
- ▪Gloves, masks, and a funnel
- ▪Spare FEP film
- ▪Manual and tool kit
Building The Machine
While the Photon S doesn't require full assembly, it still introduces you to key setup steps that matter in resin printing. Instead of wiring motors or building a frame, you're learning how to level the build plate, handle resin safely, and manage your print files, all with the machine mostly ready out of the box. It's a different kind of learning curve, but it still teaches you ownership and process.
| Setup Step | Estimated Time | What to Watch For | Helpful Tip |
|---|---|---|---|
| Unboxing | 10 minutes | Check for shipping damage | Save the foam inserts for storage |
| Build Plate Install | 5 minutes | Misalignment or uneven pressure | Hand-tighten before final adjustment |
| Manual Bed Leveling | 10 minutes | Uneven corners or tilt | Use the paper method for leveling |
| Test Print Load | 5 minutes | USB not recognized | Reformat USB to FAT32 if needed |
| First Resin Print | 2–6 hours | Over/under exposure | Use default test file and included resin |
First Impressions on the Machine and Print Quality
When you take the Photon S out of the box, there's a sense of readiness. Unlike DIY kits that demand hours of bolt-tightening and wire-routing, the Photon S ships are mostly assembled. You'll only need to mount the build plate and level it, which takes less than 15 minutes. The chassis feels sturdy, the touchscreen interface is straightforward, and the enclosed design gives it a clean, professional look.
The twin linear rails on the Z-axis are one of the first things you'll notice. They help keep prints stable during layer transitions, a small touch that has a big impact on print quality. Combined with the improved UV lighting matrix, the Photon S offers sharp, consistent prints with very little fiddling.
When it comes to printing quality and experience, well, resin printing is inherently messier than FDM, but the Photon S does what it can to make the experience more manageable. The resin vat is easy to remove and clean. The included build plate has a textured surface that helps prints stick reliably. Anycubic's leveling process is simple: loosen the screws, hone the plate, press it down gently with a sheet of paper, then tighten.
You'll be up and printing your first model in under 30 minutes. It supports files from Anycubic's Photon Workshop slicer, though many users eventually switch to Lychee Slicer or Chitubox for more flexibility. Once sliced, your files are saved to a USB stick and plugged into the side of the printer.
Print speeds are typical for a resin printer: expect around 20-30 mm/hour, depending on layer height. But what you get in return is exceptional detail. Whether you're printing tiny faces, ornate jewelry, or parts with internal detail, the Photon S punches well above its price tag.

Design and Specifications
The Photon S keeps things compact but functional. Its outer shell, available in black or white, houses a 2560 x 1440 LCD screen that precisely masks UV light to cure photosensitive resin layer by layer. This masked stereolithography (MSLA) technique is what gives the Photon S its impressive print accuracy and clean surface finishes.
Unlike earlier resin printers that often suffered from banding or instability in taller models, the Photon S improves mechanical precision by adding dual Z-axis linear rails. These dual rails reduce vertical wobble and increase stability during long or complex prints, especially on tall builds where small vibrations can ruin detail. Combined with its reinforced UV LED matrix, this printer consistently delivers crisp results with minimal need for recalibration. It's not just about specs, but it's about dependable consistency that users can trust print after print.
Specs at a Glance
- ▪Build Volume: 115 x 65 x 165 mm
- ▪Layer Resolution: 25–100 microns
- ▪XY Resolution: 47 microns (2560 x 1440 pixels)
- ▪Z-Axis: Dual linear rails
- ▪Light Source: UV LED matrix (405 nm)
- ▪Connectivity: USB
- ▪Touchscreen: 2.8-inch color
Slicer Compatibility: Photon Workshop, Lychee, Chitubox
Possible Upgrades for Photon S
The Anycubic Photon S is a solid machine out of the box, but like any 3D printer, there's always room to make it quieter, cleaner, and more consistent. If you're chasing better print quality or just want a smoother day-to-day experience, a few smart upgrades can really go a long way.
Quieter Fans for Peaceful Printing
One of the first things you'll probably notice about the Photon S is the fan noise. It's not deafening, but it's loud enough to be distracting if you're working nearby. Replacing the stock fans with quieter third-party options (like Noctua-style fans) can make a huge difference. You'll still get proper cooling for the electronics and UV light system, but without the constant hum. If you run prints overnight or work in a shared space, this mod will be worth every penny.
Activated Carbon Filter for Resin Smell
Resin printing comes with a smell. The Photon S has decent airflow, but it doesn't include a built-in carbon filter. That means any odors produced during printing will hang around unless you do something about it.
A simple fix is to add a USB-powered fan with a carbon filter at the exhaust. You can mount it inside the enclosure or even print a custom filter housing. This won't eliminate all fumes, but it helps reduce the smell significantly. If you print often or work in a small, enclosed room, this upgrade makes your setup way more livable.
Upgraded FEP Film for Consistency
The FEP film at the bottom of your resin vat is what keeps the resin contained while letting UV light pass through. Over time, it wears out. You'll start seeing more failed prints, less reliable adhesion, or clouding in your layers. When that happens, it's time for a new sheet.
Instead of replacing it with a basic FEP, many users go for a higher-quality or thicker version. These tend to last longer, release prints more easily, and provide better overall consistency. You won't notice a change right away, but your long-term reliability improves.
Magnetic Flexible Build Plate
Removing a finished print from the stock Photon S build plate can be a chore. You usually have to wedge a metal scraper under your model and hope it doesn't crack. A flexible, magnetic build plate solves that issue. Once installed, you simply remove the magnetic top sheet, flex it slightly, and your print pops off cleanly. No more damaged models or fighting with tools. It also makes cleanup faster and less stressful – especially helpful if you're printing multiple times a day.
LCD Screen Protector
If you only get one upgrade, this might be the one. The masking LCD screen on the Photon S is what shapes each layer of your print – and it's not cheap to replace. If resin ever leaks through a damaged FEP sheet and lands on the screen, it can ruin the panel. A thin plastic screen protector sits between the FEP and your LCD screen. It's cheap, easy to install, and can save you from an expensive repair. It doesn't affect print quality and gives you peace of mind in case a print fails badly.
All-Metal Resin Vat
The stock vat is fine for most users, but some like to upgrade to an all-metal version. These premium vats often come with easier-to-read resin level markings, sturdier construction, and replaceable feet. They're more durable and sometimes easier to clean, especially if you're switching between resins frequently. If you use your printer a lot or like having multiple vats ready to go, this upgrade can save time and frustration.
Remote Monitoring Setup
The Photon S doesn't have Wi-Fi, but you can still set up a simple webcam station using a Raspberry Pi. You won't be able to control the printer remotely like with OctoPrint on FDM machines, but you can keep an eye on your prints, record timelapses, or catch failures early. Even a basic USB webcam on a tripod pointed at the print area can help. For long prints, it's nice knowing you can check in without being in the room.
Maintenance, Upkeep, and Reliability
The Anycubic Photon S is known for its consistency, but to keep it printing clean and sharp, it needs regular care. Resin printing is more delicate than FDM, and the Photon S has its own quirks you should stay on top of.
Cleaning the Resin Vat
Keeping your Photon S in top condition starts with cleaning the resin vat after every print. Once a job is done, you should pour the unused resin back into the bottle through a fine mesh filter. This ensures that no cured chunks make it back into your fresh resin. After that, gently wipe the vat with isopropyl alcohol using a soft paper towel or lint-free cloth. You should never leave bits of cured resin in the vat, because they can mess up future prints or damage the FEP film. As you clean, check the film for any signs of clouding, scratches, or excess stickiness. If prints start failing more often or sticking badly, it's probably time to replace that FEP sheet.
Caring for the Build Plate
Every time you finish a print, clean the build plate with isopropyl alcohol. If there's any cured resin left on the plate, gently scrape it off using the plastic scraper that came with your printer. Never use a metal scraper since it can scratch the surface and ruin adhesion.
Over time, you might notice that your prints are not sticking as well as they used to. When that happens, lightly sanding the surface with fine-grit sandpaper, such as around 600 or 800 grit, can help restore the textured grip that resin sticks to so well.
Maintaining the LCD Screen
One of the most important components in the Photon S is the masking LCD screen. It's the part responsible for shaping each printed layer with UV light, and it needs to stay clean and undamaged. If you ever have a print failure or resin spill, inspect the screen right away. Carefully wipe it clean using isopropyl alcohol and a soft microfiber cloth.
Don't scrub or apply pressure-just let the alcohol do the work. If you haven't already, consider applying a screen protector. It's a small addition, but it can save you from major repairs if resin ever leaks past the FEP.
Cleaning Fans and Vents
You should also pay attention to the fans and vents. These parts keep the electronics and UV light system cool and help manage airflow. Over time, dust and fumes can build up, especially near the intake and exhaust fans. Every few weeks, turn off and unplug your Photon S, then gently clean the fan blades and vents using a soft brush or compressed air. If your printer starts sounding louder than usual, the fans might be dirty or worn out. In that case, give them a good cleaning or look into replacements.
Lubricating the Z-Axis
Another area that deserves attention is the Z-axis. The dual Z-rails on the Photon S help the platform move smoothly up and down. If you hear grinding or start seeing lines on your prints that weren't there before, your rails might need a quick wipe and re-lubrication. Once a month, or roughly every 20 to 30 prints, you should wipe down the rails and lead screw with a dry cloth. After that, apply a small amount of lithium grease or PTFE lubricant. Don't overdo it. Just a thin layer is enough to keep the movement smooth.
Firmware and Settings Backup
While the Photon S does not receive firmware updates very often, it is still a good idea to check the Anycubic website or user forums every few months. If an update is available, it could improve performance or fix bugs. It's also a good habit to back up your slicer settings. If you are using Photon Workshop, Lychee Slicer, or Chitubox, saving your exposure profiles and printer settings can save you a lot of trouble later.
Comparisons With Its Competitors
The resin printer market has changed a lot since the Anycubic Photon S first launched. With newer models offering 4K and even 8K resolutions, faster print times, and smarter features, it is fair to wonder whether the Photon S still deserves a spot on your desk. The answer depends on what you care about most: raw specs, ease of use, reliability, or price.
| Feature | Photon S | Elegoo Mars 2 Pro | Phrozen Sonic Mini 4K |
|---|---|---|---|
| LCD Type | RGB (2K) | Monochrome (2K) | Monochrome (4K) |
| Build Volume (mm) | 115 x 65 x 165 | 129 x 80 x 160 | 134 x 75 x 130 |
| XY Resolution | 47 microns | 50 microns | 35 microns |
| Z-Axis | Dual linear rails | Dual linear rails | Single linear rail |
| Print Speed | 20 mm/hr | 30-50 mm/hr | 60 mm/hr |
| Noise Level | Moderate | Higher | High |
| Price Range (USD) | 180 – 220 | 220 – 270 | 280 – 350 |
| Best For | Reliable details | Fast prints, reliability | Ultra-fine detail |
While newer printers offer more pixels per layer, many also come with rushed firmware or inconsistent quality control. The Photon S has had years of refinement, and that shows in how stable it runs. It boots reliably, handles long prints without issue, and has a proven track record across thousands of users.
Compared to the Elegoo Mars 2 Pro, for example, the Photon S trades the monochrome LCD and faster layer cure times for a more refined Z-axis. The dual linear rails on the Photon S reduce wobble and allow more consistent tall prints. You may not get blazing-fast layers, but you get predictable results that do not shift mid-print. If your priority is detail over speed, the Photon S still holds up well.
Against something like the Phrozen Sonic Mini 4K, the Photon S does fall short in raw resolution. The Mini 4K offers 722 PPI on its screen, making it excellent for capturing ultra-fine details. However, it also tends to run louder, gets hotter, and is more prone to firmware hiccups. The Photon S, on the other hand, is quieter and more forgiving. It is easier to level, easier to clean, and does not require as much slicer tweaking.
Our Final Verdict
If you're new to resin printing or want a reliable, detail-focused machine, the Anycubic Photon S is a hard printer to dismiss. It's not the quietest, fastest, or most modern, but it prints beautifully and teaches you how resin printing works without overwhelming you.
You'll learn proper support techniques, dial in your exposures, and come to appreciate the value of a sturdy frame and consistent mechanics. That's why the Photon S is still alive and well in 2025: it may be old, but it works, and it works well.
1. Anycubic.com, "Anycubic 3D Printing" Accessed July 26, 2022.

Scott Gabdullin is a Canadian entrepreneur, investor, and marketing expert who has successfully combined his passion for technology and innovation with a love for adventure and exploration.
Scott brings 12 years of digital marketing experience and a hardcore work ethic to his new passion for 3D printing. If he is not working on this business, he is likely travelling and Overlanding across North America with his wife and 2-year-old son in their Jeep Rubicon.
Read more →